Tips For Body Clipping Horses
By: Taylor Fabus/Michigan State University Extension and Gabrielle Dingell, MSU student
Many horse enthusiasts may not know that body clipping can serve purposes other than simply aesthetics. In this Michigan State University Extension article, we’ll explore a variety of uses for clipping horses and learn many tricks to improve your overall clipping performance and final product.
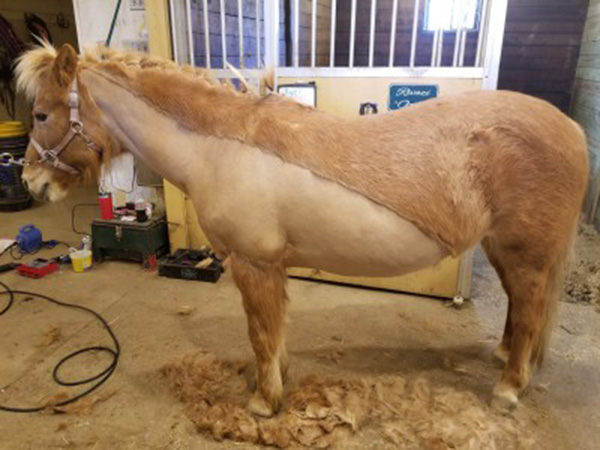
Horses can be clipped for several different reasons, but most commonly it is related to health and comfort reasons. One such health condition where horses are clipped is Cushing’s, a disease that can cause a horse to not shed its winter coat properly. Clipping a horse suffering from Cushing’s disease, even with a partial clip, allows a horse to regulate their body temperature more effectively in the summer and winter months.
Additionally, during winter months, you may perform a trace clip on a horse to better diffuse heat while working. A trace clip is where only a portion of the horse’s body is clipped. This reduces the sweat produced during work, as well as the time it takes a horse to cool down and dry off after work. There are many different types of trace clips to choose from, each serving a slightly different purpose.
During the summer months, you may perform an entire body clip on horses. This gives a clean, tidy appearance and can aid in show preparation by reducing the time it takes to wash. Before beginning to clip, remember that a horse will not be show ready overnight from a clip. Allow at least two weeks for hair to settle and grow out after a clip for optimum result.
A basic list of supplies to clip a horse will include body clippers, blade wash and coolant, a set of rechargeable clippers, towels, twitch, coat conditioner, sidewalk chalk and a variety of brushes. Body clippers are heavier duty clippers compared to the ones used to clean up whiskers and ears. You should also have a set of quiet, rechargeable clippers to get in tiny spaces and do clean ups.
A standard body clip is done with a #10 blade, and you should have at least three blades on hand. Blade cleaning supplies include blade wash and blade coolant. Things that aren’t exactly necessary, but can be very useful to have on hand, include a twitch, coat conditioner such as Showsheen, towels and one unexpected tool: sidewalk chalk.
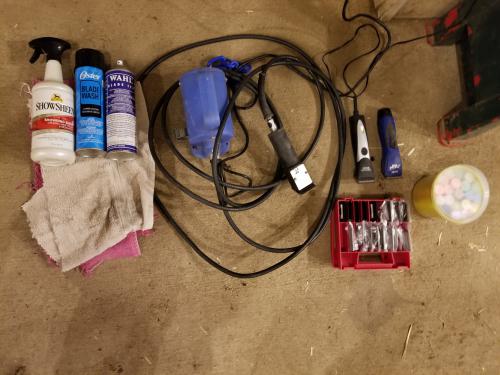
Body clipping supplies.
The very first step for the best clip starts with bathing the horse. Ensure all dirt, mud and excess loose hair is off the horse. Clipper blades dull quicker with dirt and grime and they will not leave a smooth finish if there is dirt in the undercoat. After bathing and drying, curry the horse thoroughly to bring out all loose hair. Finish with a spray of coat conditioner and work it in with a stiff dandy brush. Keep that brush on hand to groom as you clip.
If doing a trace clip, it helps to give yourself guidelines to follow. This is where the sidewalk chalk comes in; it works great for this purpose. Choose a chalk color that will show up on your horse and then wet the chalk to make lines where the edge of your clip will be. If you mess up, simply wipe away and restart.
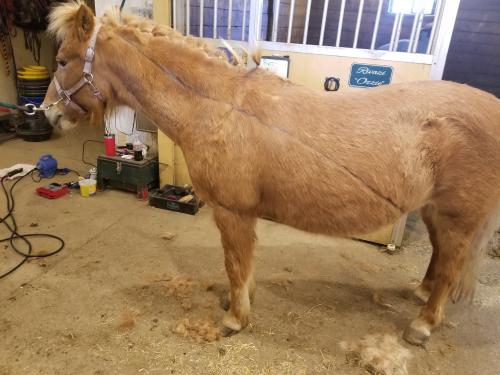
Marking lines on the horse using chalk can help give you a guide to follow as you attempt a trace clip.
After prepping the horse, start at the shoulder where the horse can see you. Turn on the clippers and make sure the horse is comfortable with the noise and feel of the clippers. Patience is key—you have a long way to go. Clip against the grain of the hair using light pressure, and let the blade cut the hair. Do not force the blade through the hair or you will end up with lines.
As you clip, you may notice very faint, tiny lines from your clippers. These fine lines are normal. Lines that are 1/8 inch apart with hair significantly longer than the rest are not normal. If this is happening, clean your blade by pouring a pool of blade wash into a small container and running the blade in the wash. If this does not solve your problem, there is a good chance you need to swap out your blade for a new one. It is completely normal to use two to three blades on a horse, especially if they have been re-sharpened.
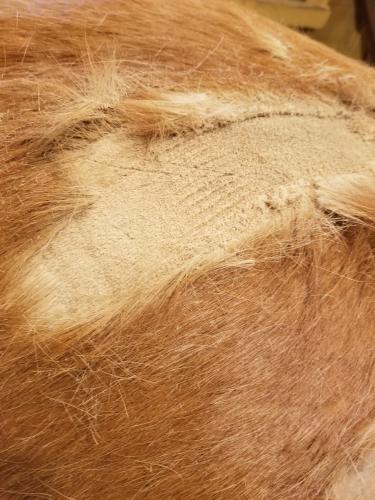
When you force the blade through the hair, you can end up with rough lines.
Once you have clipped your preferred trace or the full body, you can move on to the legs. Legs have hair that is significantly coarser than the body hair. If you have a horse with excessive leg hair, trim it back with scissors prior to clipping. This will save time and wear on your expensive clipper blades. Make sure you clip the legs from every angle possible. If needed, have a friend lift a leg so you can get every spot of the opposing leg.
The last piece to clip, and most important part, is the head. Every time you do a horse’s head, have a fresh blade and take your time. Start wherever your horse is most comfortable and save the hardest spots, typically the ears, for last. If your horse is incredibly unhappy about their ears, muzzle or eyes, feel free to apply a twitch for a limited amount of time and work quickly. It is important to make this a good experience for the horse so that future clippings will not be difficult.
There are a few important things to keep in mind as you clip. First, make sure to brush and towel off your horse. You want to clip every inch, so brushing away the excess hair will give you a clearer view of what hair still needs to be clipped. Touch ups, at a later date, are always an option, but it’s best to avoid them. Also, keep an eye on the temperature of your blades. If they feel warm to the touch, spray with coolant or swap out the blade. Sometimes horses will start to dance or move away from the clipper—they could be telling that the blade is too hot.
Your final step to clipping your horse is another bath. The tiny hairs produced by clipping are incredibly itchy. Make sure they are all off your horse and give them a good condition to rehydrate the open hair follicles. Cover your horse in a thick, wool cooler to dry and give them some hay to munch on. Keep a close eye on how your horse reacts to the weather in the next few days, as they may need an extra blanket or sheet without their long coat.
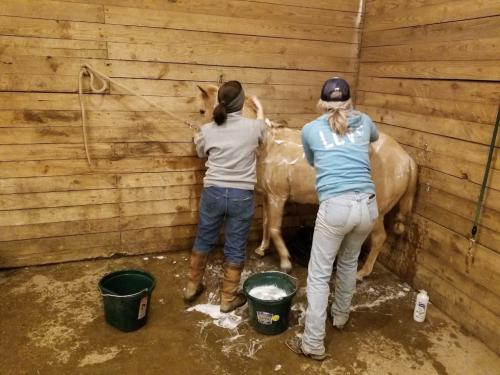
It is crucial to give a freshly clipped horse a thorough bath.
Not only can clipping be useful, it can also lead to a career or supplemental income. Check out the Michigan 4-H Horse Program’s Facebook page for an interview with Gabrielle Dingell, professional body clipper and co-author of this article.


