The Kindest Cut- Preserving Memories in Horsehair

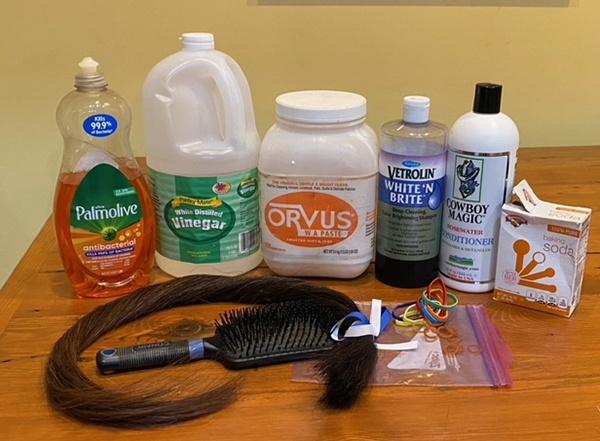
Essential supplies
By: Julia Adams
Sometimes, if you’re lucky, your four-legged best friend gives you the look, and you just know. You breathe a sigh of relief that they’ve conveyed a silent plea of help, and you pick up the phone and make the dreaded call. The day comes, and you’re as mentally prepared as you can be to say goodbye.
The date was booked. The vet had plenty of time to arrive. The proper people were called to help with heavy machinery, and the end is quiet and peaceful.
Other times, this is just not possible. The reality of owning stock animals and horses means that you must always expect the unexpected and be ready to lose them in the blink of an eye, even when it’s -10 outside, the ground is frozen solid, or it was a panicked final moment. And then… they’re gone.
Regardless of the timing, it’s something we must all deal with eventually as horse owners. It’s the price we pay for loving them. Their time with us just cannot be as long as we’d like.
What can you do in those final moments to ensure that you can keep a piece of them with you, even when they’re no longer physically here? You cut their tail and send them into the next life with a nice bob.
Their last gift to you is their longest length of love that you can tie around your wrist, hang on your keys, put in a pendant, or memorialize in a shadow box. But it’s up to you to cut it and store it to ensure you can keep that piece of them with you for generations to come.
As the owner of a very small business that creates horsehair keepsakes, I speak with horse owners on a daily basis who ask for advice on what to do with tail hair. They want to know how best to clean or store it; so that, when they’re ready, they can enjoy the piece of their loved one that they have left.
I’ve been braiding for a few years now. It never fails to bring tears to my eyes when a tail comes in the mail, and I unwrap it to find it full of brambles, caked in mud, or taped together at the top. Sometimes, the veterinarian or trainer sends in the bundle because the owner couldn’t do it. I get it.
But, at the same time, I’d like to help as many people as I can to be proactive in this endeavor, if possible. In that hope, here are some braider’s tips and tricks to help people feel confident and comfortable taking the proper steps to cut a tail, clean it, and store it for the future when the day finally comes to say goodbye.

A good length of hair
Part I: When to Cut a Tail
Cut the tail in advance of the date of euthanasia, if you’re able to do so. This allows you to have it off your to-do list and off your mind so you can focus on saying goodbye. Some people (if an appointment has been booked) choose to cut a smaller bundle a month or so in advance so they can have an item made and ready to be worn on the date, when it comes. It’s about your comfort and timing of the final days.
Part II: How Much to Cut?
I always recommend cutting the entire length of tail. I know it feels awkward sending them on without it, but you will be glad for it later. Believe me. Gather the entire length of the tail, use a hair tie to bundle it off, and cut with good scissors just below the tailbone. If the tail is thick, use large, elastic, hair ties without metal crimps. Do not use tape, zip ties, or vet wrap. Tape rips the tail when it’s removed, zip ties are impossible to get off without heavy-duty scissors, and vet wrap can hold moisture. Also, avoid braiding it down. Leave it loose like a ponytail to avoid crimping and breakage.
Part III: How Should I Clean the Tail?
Once you’ve cut the tail, even if you’re not planning on having items made, wash it for storage. Avoid throwing the tail in a bag while it’s wet and dirty or it will rot and mold. You want to remove any urine, feces, dirt, product, and moisture before storing your tail in a bag.

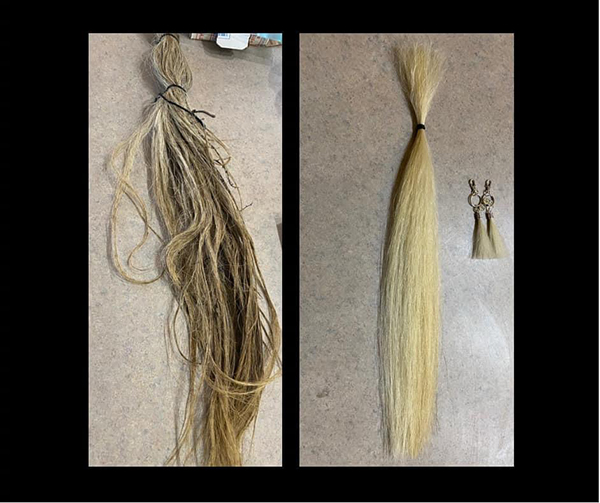
Before and After!
Initial wash: Use warm water and scrub thoroughly with antibacterial dish soap like Palmolive or Ajax. This will strip the tail of the worst residue.
Second wash: Use a product like Orvus shampoo that’s mild, scentless, and lathers well. Make sure the whole tail is washed and that you use a scrub brush or toothbrush to address any tough and dirty parts.
Third wash: For those light-colored tails, or exceptionally dirty ones, make a paste from Orvus shampoo, baking soda, and water and cover the tail with the paste. Work it in well and let sit for about 20 minutes. Rinse the whole tail with white vinegar. This will create a lot of foam, but it’s stripping the stains from the hair. Rinse with water. You may need to repeat this process multiple times depending on the severity of the staining.
Fourth wash: At this point, if you have a light or white tail, it’s time to use whitening shampoo. I prefer White ‘N Brite shampoo. Work this into the hair and let it sit for about 15 minutes before rinsing with water. You may need to repeat this process multiple times to reduce the yellow tint. Some people go so far as to dye their tails back to white!
Conditioner: You don’t need to condition the tail for storage, but I find it’s easier to blow out and manage if it is. I use Cowboy Magic’s rosewater conditioner or Mane ‘N Tail conditioner. Rise well with water when done.
Blow-dry and brush out: You can let the tail air dry on towels or blow-dry it. I prefer to blow dry every tail I work with to ensure it’s good and dry, and I can inspect the whole thing. This process takes a while, especially if the tail is thick. About halfway through blow-drying, I like to bundle the tail and brush it out. It helps to dry it, and you get rid of some of the top tail that you don’t need to keep.
 To brush out the tail and relieve it of the “top tail” short pieces, gather it at the top of the bundle and run your hand down the length of the tail about 8-12 inches. Take a good hairbrush and, while grasping the tail length in one hand, brush upwards towards the head of the bundle. You will see large clumps of the short hairs come out. This is normal. This is one of the reasons I always recommend cutting the whole tail length. When you brush out the top tail pieces, you’re left with the best of the bundle that’s long and best to use in the future if needed.
Storage: When the tail is completely dry and brushed out, gather the bundle, use a new hair tie or elastic to rubber band it off, and select a gallon-sized, plastic, Ziplock bag to store it in. Again, don’t braid it down. Leave it loose like a ponytail. Take all air out of the bag and label it with a date and name in marker on the outside. Store it in a cool dry place where it won’t be sun-bleached or in danger of exposure to the elements.
By taking these steps you will ensure your tail is stored properly, and you will have a piece of your loved one that’s clean and prepped for when, and if, you would like a keepsake made. Try to look at the process as a last gift to make them beautiful. Let it be therapeutic and allow it to bring you a sense of closure. You are doing them a kindness, and you will have a piece of them always.
Commonly Asked Questions:
Q: I have a 30-year-old tail. Will it be too brittle/old to use for a keepsake? No, not if it was cleaned and stored properly!
Q: How much tail does it take to make a bracelet? A small bundle of tail hair the diameter of a pen and a good arms length.
Q: Can I use mane hair for keepsakes? You can for some pendants, but generally speaking it’s too fine and soft for bracelets. It’s not nearly as durable as tail hair.
Q: What’s the hardest project you’ve had to do? I converted a bird’s nest made from the tail hair of a horse in the 1970s into a pendant!
Q: What is the nicest tail you’ve ever worked with? HBF Iron Man. It was snow white, like a unicorn’s tail, and so long!
Q: What was the dirtiest tail you ever worked on? There was a tail sent in a couple years back from a grey mare that had melanomas that had ruptured. The poor girl passed away and her tail needed a LOT of TLC to get back to being its usual pretty white color. I cried when I received it, and I was so happy to give it back to her mom- clean and gorgeous.
Q: If my tail was improperly stored, can it still be used? Maybe. It depends on if it was wet when it was stored. Moldy or wet tails will disintegrate over time. Dry, muddy tails break over time. It depends on the severity of the damage.

With a properly preserved tail, you will have the opportunity to create a keepsake for the future, if you choose to do so.
Julia Adams, Owner of Goldun Custom Creations
www.golduncustomcreations.com


