Selecting the Perfect English Saddle
Click here to read the complete article
Shopping for saddles can be as overwhelming as shopping for horses. What size do you need? What style? What color? Does it fit your horse properly? With so many options, how can you know for sure?
By Doreen Shumpert
Many equestrians are more familiar with what to look for in a Western saddle than with the English variety. So, who better to ask than Master Saddler, Suzie Fletcher-Baker, an internationally-respected English saddle maker whose career spans 40 years. As the daughter of a hard-working English family in Witney, Oxfordshire, England, she was told she would have to manage the care of her own pony, including buying her own tack—which she did. When her first saddle broke, it led to her meeting her first master saddler at a young age. In the decades following, she studied with the harness maker for the Queen and her knowledge, craftsmanship, and commissioned saddles bring top dollar both in the United States and overseas. She was kind enough to share some insights on what to look for when purchasing an English saddle – whether new or used.
(photo 1)
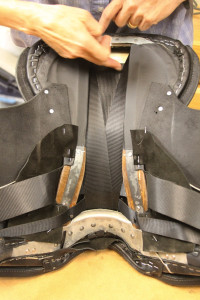
Just as in a Western saddle, a good quality tree in an English saddle is essential. “A good English saddle tree is an art all its own,” Fletcher-Baker says, and she’s purchased hers from the same company in England for decades. “This tree is a work of art. Wooden, traditional trees are my preference. This one is beautifully finished, is a spring tree, has great head plates and gullet plates, and is made of beech wood, which is preferable due to quality and longevity,” she says. “The tree is sandwiched between the two plates because the pommel takes the stress. This tree is nice and symmetrical; there’s no diagonal rock to it like you see in some factory-made varieties. Even though most riders and horses have something crooked, we want to make sure our tree and saddle doesn’t! When I make a saddle, I take a great deal of care to make sure the tree doesn’t get torqued in any way when we are pulling on the webs (photo 1A). The web is a sling or hammock made of nylon, and the billets attach to it. We also want the rails (the flat parts of the tree that contact the horse’s back) to flatten out, as the horse’s back does the same. If they are angled—and some are—they stick into the horse’s back and create numerous problems.”
She notes that synthetic trees are also “ever present” in both higher and lower quality saddles and that some flex and some are rigid. Their composition determines how they perform, so considering rider, horse, and usage is always important and should be discussed with the tack shop, agent, or professional.
“The tree is everything,” she cautions. “The design determines the effectiveness of the saddle. It’s important to deal with somebody knowledgeable who knows what the foundation of the saddle is. The tree needs to fit the horse. A tall, high-withered horse isn’t automatically wide, yet the saddle needs to clear the withers. That comes into the design of the tree, as does one that fits a mutton-withered horse.”
2. The Stirrup Bars
(photo 2)
Continuing on the lesser-seen, often lesser thought-about elements, Fletcher-Baker stresses that quality stirrup bars are crucial for safety. In fact, a stirrup bar is what broke on that first saddle she owned as a child, so she has first-hand knowledge of the danger. “The stress is immense on the stirrup bars, especially in jumping—on the landing—for instance,” she explains. “This one is made of high-quality stainless steel and beautifully made. The stirrup leathers hang off of the stirrup bar, so they are under constant stress. Inexpensive ones made of nickel, or poor quality stainless steel that’s not casted well and has bubbles in it, aren’t desirable and are weaker and a safety hazard. An easy way to tell if they are made of quality steel is they should be smooth like this—not rough feeling and pitted looking.”
Another major hazard is “riding with the thumbs up.” She isn’t talking about the ones on the rider’s hands. Rather, the back portion of the stirrup bar that can be positioned either up or down is called the “thumb.” These should be positioned down when riding, aligned with the rest of the bar and not in an upward position (photo 2). “If the rider gets a foot caught in the stirrup and comes off, we want those stirrup leathers to break away, off of the back of the stirrup bar,” she explains. “Unfortunately, if the thumbs are up, they won’t—and it can be fatal,” she warns. As a precaution, she says saddle makers are leaning toward a style of stirrup bar that just has an upward slant, without a moveable thumb, to help prevent such fatalities. Due to the constant pressure on the stirrup leathers, she said there’s no concern about them coming loose during normal riding.
3. The Seat
(photo 3)
Ideally, you want the seat to be made of full-grain leather, which is the top layer of cowhide, for both beauty and longevity. Unfortunately, some saddles contain leather that has a “false finish,” so it looks smooth, but isn’t top quality, and it will start to peel over time. Since many buyers aren’t leather experts, she suggests this be another question for the agent or tack shop before you make a purchase. She only uses top quality cowhide tanned in England, because the English tanning process is exclusively tailored for the saddle trade—and exactly what she wants every time.
The seat should also be correct, straight, and well-designed for the discipline you plan to compete in, because it will assist the rider with proper balance, which directly transfers to the performance of the horse. The lowest part of the seat should be in the center, or slightly forward of center.
(photo 4)
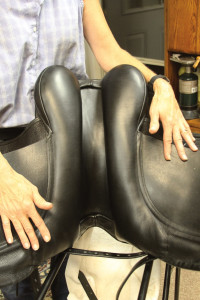
The job of the panels is to protect the horse’s back from the tree and to spread the rider’s weight evenly over a large area, she explains. One should check to see that they are sewn on evenly and tightly, as they are separate from the seat. Depending on the design of the panels, they are what balance the saddle. “If the panels are baggy or loose, this is a problem, because they will shift and irritate the horse’s back,” she says.
Panels are filled with either wool flocking or foam. Jumpers prefer foam, but she prefers wool flocking. “I just think it does the best job at protecting, and you get more absorbency for impact,” she says. It’s also possible to go into the panels and rebalance or repair the saddle by taking the flocking in and out. Sometimes, that’s all it takes to get the saddle back in proper balance and relieve stress on the horse.
5. The Billets
(photo 5)
There are a variety of billeting systems, but this dressage saddle exhibits the basic system—Fletcher-Baker’s preference.
“In the basic system, we have the billets built on separate pieces of webbing for safety, and it also spreads out the downward pull on the horse,” she explains. “If the billets are close together and bunched up, it’s going to put too much pressure in one area, so we like to see them a good hand-width apart.” In this example, the front billet comes from just behind the tree point, and the other originates a little farther back. Sometimes, they extend down from a V-formation for added pull from the back, but she prefers the system pictured for overall effectiveness.
6. Flaps and Knee Blocks
(photo 6)
The flaps and knee blocks have a lot to do with the style you choose. In brief, she says the flaps accommodate the rider’s leg length and should be considered when evaluating proper fit. As for knee blocks, this saddle exhibits exterior knee blocks, versus a block on the underside. Exterior knee blocks like this need to fit the particular rider’s femur, she explains, because they are felt more than blocks on the underside. “You can get away with more with blocks underneath, not so with exterior blocks. These are lovely, with a nice angle, and good design and shape,” she adds.
7. Overall Quality and Considerations
As with anything else, the details—or lack thereof—say a lot about overall quality. According to Fletcher-Baker, the saddle should visually have a lot of overall substance. It shouldn’t show any wrinkled or stretchy parts. The stitching should be even and neat (photo 7). In less-quality saddles the stitching can be uneven, and the piping/seam can fluctuate between deep and narrow instead of uniform. The head nails, fittings, and hardware (photo 7A) should be good quality; if they look cheap, they probably are. She notes that the head nails are still made by hand for a high-quality saddle, so don’t expect them to always be entirely uniform.
While certain saddles seem to “scream low quality,” she says synthetic saddles can be useful on a low budget. Just know synthetics don’t last as long as leather, and spend as much as you can to minimize risk.
“What I see with less expensive saddles is they copy the well-known brands, but inherently the trees are inferior and can be quite weak and break. Quite frightening for me is the metal work; hardware and stirrup bars often aren’t well-made. It’s a huge safety issue, and I have them come in for repair. How the billets are sewn on—how the webbing is attached to the tree—sometimes these can be substandard over what I’d recommend,” she warns. “Safety is huge and number one. Any saddle needs to be safe, hold up, and do the job. When buying a saddle, it’s essential to deal with an expert who knows.”
In conclusion, Fletcher-Baker advises shoppers to utilize the used market, especially on a budget, because you will get more for your money. Realize that certain aspects of the saddle can be changed to work for you and your horse. Also, deal with knowledgeable people who can offer a guarantee, and find out about warrantees and get the details in writing. Finally, if your horse starts to exhibit behavioral issues—this can actually relate to saddle fit. It’s always wise to have overall saddle fit, for you and your horse, evaluated by an expert.


